Diesel exhaust staining on a boat transom: causes and removal
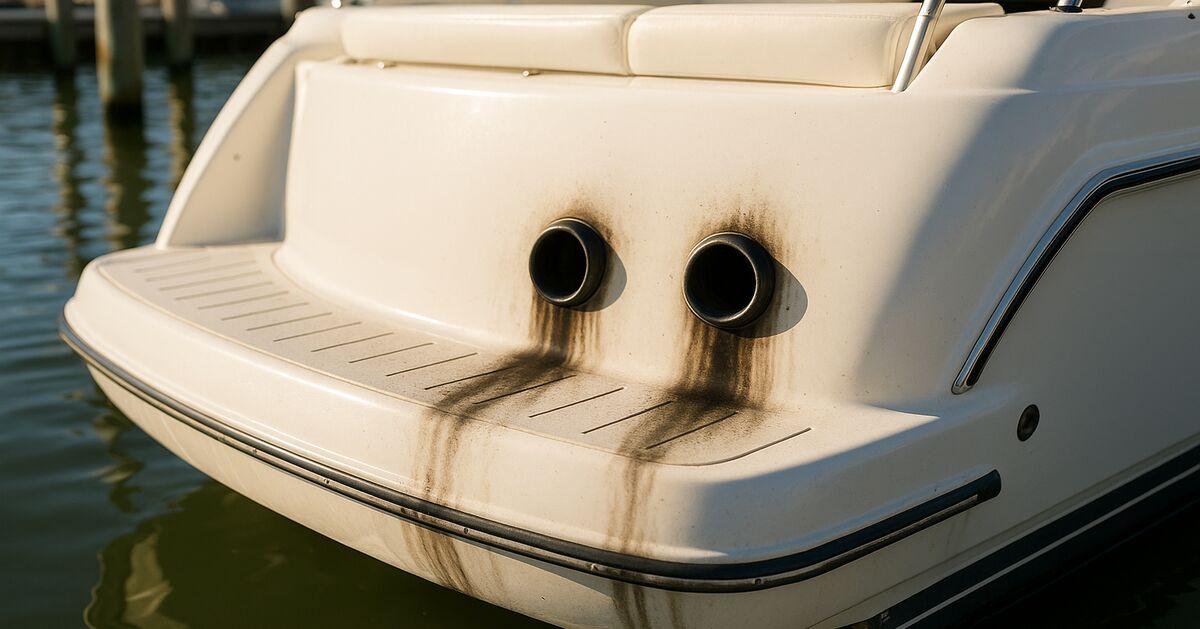
That dark, oily shadow streaking down the transom of your boat is not just dirt. It is a layered chemical deposit left behind every time your diesel engine runs, and it bonds to gelcoat in a way that ordinary boat soap will not touch. If you own a diesel-powered vessel docked anywhere from Longboat Key to Casey Key, this stain is almost inevitable. The good news is that it is fully reversible if you treat it correctly and early.
What diesel exhaust staining actually is
Diesel combustion produces a complex mixture of gases, water vapor, soot, and unburned hydrocarbons. When those exhaust gases exit your transom ports and hit the cooler fiberglass surface, the heavier components condense and stick. What you see as a stain is really several things at once:
- Carbon soot - tiny particles that settle into the pores and texture of your gelcoat
- Unburned fuel residue - oily hydrocarbons that act like glue, helping the soot stick and holding additional grime on top
- Sulfur compounds - a byproduct of sulfur content in diesel fuel; these can react with moisture and etch into the gelcoat surface over time
- Metallic particulates - trace metals from engine wear and exhaust system components
Together, these create a deposit that is simultaneously oily and abrasive. The oiliness makes it resistant to water-based cleaners. The abrasive carbon particles mean that scrubbing too hard before loosening the deposit will grind microscopic scratches into your gelcoat.
Per EPA emissions standards documentation, modern ultra-low-sulfur diesel (ULSD) has dramatically reduced sulfur oxide output compared to older fuel formulations, but soot and hydrocarbon residue remain present in all diesel exhaust at meaningful levels. Boats running older engines or engines that are not fully warmed up before being put under load tend to produce noticeably heavier deposits.
Why the transom is especially vulnerable
Your transom takes the staining hit for several structural reasons. First, the exhaust exits at or near waterline level, so the surface directly above and around the ports is in the constant plume path. Second, the transom is a near-vertical surface, so condensed exhaust products run down rather than sheeting off, creating those characteristic vertical dark streaks. Third, boats in our area spend a lot of time idling. Diesel engines in displacement mode, moving slowly through marina channels or no-wake zones on the Intracoastal, produce more soot per mile than engines running at cruising RPM under proper load.
Add the salt air environment of Sarasota County into the mix and you have another accelerant. Salt is hygroscopic, meaning it pulls moisture from the air and keeps surfaces damp. That continuous film of salty moisture helps the oily exhaust residue spread, migrate downward, and penetrate deeper into gelcoat pores before it dries.
Boats stored in wet slips tend to show heavier transom staining than boats on lifts, simply because they are lower in the water and idle more during docking. If you want to understand more about how your storage situation affects surface chemistry in general, the post on ceramic coating on boats in wet slips vs. lifts covers that dynamic well.
How fast does the stain set?
This is where a lot of boat owners get into trouble. A fresh exhaust deposit is relatively easy to wipe away. Within a day or two in the Florida sun, the hydrocarbon binders begin to oxidize and polymerize. Think of it like a thin varnish baking onto your gelcoat. After a week of UV exposure and heat, what could have been removed with a degreaser and a cloth now requires a cleaner-wax compound. After a month or more, you may be looking at light machine polishing.
The window for easy removal is short, which is exactly why post-outing care matters so much. Our post on what skipping post-outing cleaning does to your gelcoat gets into the broader cost of letting deposits sit, and diesel exhaust staining is one of the clearest examples of that principle in action.
Step-by-step removal process
Step 1: Safety first
Diesel cleaning products, and especially the degreasers strong enough to tackle exhaust residue, are not trivial chemicals. Work in a ventilated area, wear chemical-resistant gloves, and avoid letting runoff enter the water directly. As a safety precaution, contain rinse water where possible and avoid using petroleum-based solvents over open water.
Step 2: Rinse the area thoroughly
Start with a good freshwater rinse to remove loose salt, grime, and any surface dust. This keeps you from grinding loose particles into the gelcoat during the cleaning steps that follow.
Step 3: Apply a dedicated marine degreaser
This is the step that most DIY attempts skip or underdo. A household dish soap or general-purpose cleaner does not have the surfactant strength to break the hydrocarbon bond in exhaust residue. Use a marine-grade degreaser, diluted per the product instructions, applied to the stained area and allowed to dwell for several minutes. This dwell time is not optional. The chemistry needs time to penetrate the oily layer.
Work in manageable sections, roughly two-to-three square feet at a time, so the product does not dry before you can work it in.
Step 4: Agitate with a soft brush or microfiber pad
Use a soft-bristle detailing brush or a foam applicator pad. Scrub in small circular motions. For textured gelcoat or areas with raised lettering, a soft detailing brush gets into the recesses far better than a flat pad. Do not use scotch-brite pads, steel wool, or stiff deck brushes on gelcoat. The scratches they leave create more surface area for future staining to grip.
Rinse and evaluate. If the stain has lightened significantly but not fully disappeared, repeat the degreaser step. For older or heavier deposits, you may need two or three passes before moving on.
Step 5: Apply a marine fiberglass cleaner-polish
Once the oily binders have been removed by degreasing, you will often find a residual gray or tan discoloration in the gelcoat itself. This is oxidized stain that has been absorbed into the surface layer. A marine fiberglass cleaner-polish (not a pure wax, which has no cleaning action) applied by hand or orbital polisher will remove this oxidized layer and restore the underlying color and gloss.
For severe staining that has been sitting for months, this step may need to be done with a light-cut compound first, followed by a finishing polish. This is the point at which many owners decide a professional detail makes more sense than continuing to buy and apply products. Our boat cleaning and detailing services include transom restoration as part of a full detail, which means the compounding and polishing is done with professional equipment calibrated for the surface.
Step 6: Protect the clean surface
A clean, restored gelcoat surface still needs protection or it will stain again just as quickly, probably faster, because you have opened up fresh pores. Apply a quality marine wax or sealant to the entire transom. If you are considering a longer-lasting solution, a ceramic coating applied professionally to the transom area creates a hydrophobic barrier that dramatically slows how quickly exhaust residue can bond. That said, no coating eliminates exhaust staining entirely. It simply makes each subsequent cleaning easier.
What makes removal harder in practice
A few things consistently make exhaust stain removal more difficult than it should be:
- Letting it go through multiple wet/dry cycles. Each time the transom gets wet and dries in the sun, the stain bakes in a little more.
- Using the wrong scrubber. Abrasive pads remove the stain but also remove gelcoat, making the surface more porous and prone to future staining.
- Skipping the degreaser step. Jumping straight to a polish or cleaner-wax without first cutting the oily layer means you are spreading hydrocarbon residue around rather than removing it.
- Not protecting after cleaning. A bare gelcoat surface without wax or sealant will reabsorb the next exhaust deposit within a single outing.
How engine condition affects staining severity
It is worth mentioning that the volume of staining you see can be a useful diagnostic signal. A diesel engine running cleanly at proper operating temperature produces far less visible soot than one running rich, with a partially clogged injector, or with an exhaust system issue. If your transom is staining dramatically faster than it used to, or if you notice black smoke in the exhaust plume, that is worth a conversation with your marine mechanic. The surface staining is manageable; an underlying engine issue is not.
How often should you address this?
For boats making regular use, a light degreaser wipe-down of the transom area after each outing is genuinely the lowest-effort approach. It takes minutes when the stain is fresh and loose. If you are on a regular maintenance wash program, make sure the transom gets degreaser attention specifically, not just a soap-and-rinse pass that will not touch exhaust residue.
For diesel boat owners who go out weekly on Sarasota Bay or run down the coast to Venice or Nokomis, a monthly transom detail focused specifically on the exhaust area is a reasonable cadence. If you are on the water less frequently, a thorough cleaning and reprotection every time you have the rest of the hull detailed makes sense.
If you are weighing whether a maintenance program or periodic one-time detailing makes more financial sense for your situation, the post comparing one-time detail vs. maintenance wash programs breaks down the economics clearly.
When to call a professional
There is a point at which DIY cleaning creates more problems than it solves. If you are seeing:
- Heavy staining that has been present for months and has not responded to two or three degreaser passes
- Yellowing or brown discoloration baked into the gelcoat beyond the surface layer
- Loss of gloss across the entire transom surface
- Any pitting or texture change in the gelcoat
...it is time for professional compounding and polishing. Attempting aggressive correction without an orbital polisher and the right pad/compound combination risks burning through the gelcoat or leaving swirl marks that require even more correction.
Owners up and down the coast, from Osprey marinas to the docks on Bird Key, deal with this stain regularly. The difference between a clean, bright transom and a permanently dingy-looking one usually comes down to two things: how quickly the stain is addressed, and whether the right chemistry is used in the right order.
Our team works on diesel-powered vessels throughout the Sarasota area and knows exactly where exhaust staining tends to concentrate, what products move it without harming the gelcoat, and how to restore the surface so it holds up longer between services. If you have a transom that is past the point of a weekend DIY fix, or if you just want it done right the first time, reach out to us and we will take a look.
For a full picture of everything that goes into keeping a boat's surfaces in good shape in this environment, our FAQ page covers the questions we hear most often from local boat owners.
Sources & further reading
- Diesel Exhaust and Particle Emissions Overview (U.S. Environmental Protection Agency)
- Ultra-Low Sulfur Diesel (ULSD) Fuel Standards (U.S. Environmental Protection Agency)
- Fiberglass Boat Maintenance and Repair Guidance (BoatUS Foundation)
Claim-by-claim audit (4 checked)
- “Per EPA emissions standards documentation, modern ultra-low-sulfur diesel (ULSD) has dramatically reduced sulfur oxide output compared to older fuel formulations, but soot and hydr…” (cited → epa.gov)
- “As a safety precaution, contain rinse water where possible and avoid using petroleum-based solvents over open water.” (rewritten to what the article can stand behind)
- “Boats stored in wet slips tend to show heavier transom staining than boats on lifts, simply because they are lower in the water and idle more during docking.” (reasoning shown in the article)
- “Diesel engines in displacement mode, moving slowly through marina channels or no-wake zones on the Intracoastal, produce more soot per mile than engines running at cruising RPM und…” (reasoning shown in the article)